Setup ArgoCD with your project
This guide walks through setting up ArgoCD with your project.
1. Create a Kubernetes Manifest
Create a kubernetes manifest for your project. This manifest defines the deployment and the services. It is similar to the docker-compose.yml file we create for our projects now. You can use something like Claude code to generate this for you.
An example of the prompt I might give is as follows:
I want this app deployed to jira.rit.services. create a kubernetes manifest for this project.
For the volumes use the longhorn pvc. please generate SSL cert similar to this :
```yaml
apiVersion: cert-manager.io/v1
kind: Certificate
metadata:
name: telefonagent-cert
namespace: telefonagent
spec:
secretName: telefonagent-tls
dnsNames:
- telefonagent.rit.services
issuerRef:
name: letsencrypt-prod
kind: ClusterIssuer
group: cert-manager.io
privateKey:
rotationPolicy: Always
 and for ingress I am using traefik ingress route, please generate this according to the services in  following format:
```yaml
apiVersion: traefik.io/v1alpha1
kind: IngressRoute
metadata:
  name: telefonagent-backend-ingressroute
  namespace: telefonagent
spec:
  entryPoints:
    - web
    - websecure
  routes:
    - match: Host(`telefonagent.rit.services`) && (PathPrefix(`/api`) || PathPrefix(`/socket.io`))
      kind: Rule
      services:
        - name: telefonagent-backend
          port: 8000
      middlewares:
        - name: telefonagent-headers
  tls:
    secretName: telefonagent-tls
and also create hpa for the deployment. The images are pushed to a private repository in docker hub, so please use image pull secrets with docker-hub-secret and also add annotation for argocd so that it always pulls latest.
After generating the manifest place is in a folder , can be named anything but for this I place it in a folder named k8s/ manifest will be a yaml file.
2. Conigure Docker Hub Secret in the Kubernetes Environment.
You need to configure the docker hub secret in the kubernetes environment so that kubernetes can pull the images from private repository. For this Following script can be run which will prompt you with inputs and setup the secret:
inputs:
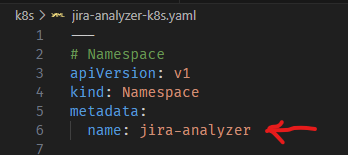
namespace: Kubernetes namespace where the secret will be created. This should be on top of your created kubernetes manifest or you can search for it in the kubernetes manifest.
docker username: Docker Hub username this is used to authenticate with docker hub. for example our username is ritservices0000docker password/token: This is the personal access toke you can create from docekr hub.docker email: This is the email you used to create the personal access token. this is the ritservices backend email in our case.
Warning
Make sure you push to the ritservi not the username ritservices0000 as we use the organization name in docker hub not the username. Most guides and claude by default assumes that you are using the username to push to the docker hub but our images have prefix like ritservi/project-frontend:latest. Pushing to ritservices0000/project-frontend:latest will work but it makes the images public.
# PowerShell script to create Docker Hub secret for pulling private images
# Usage: .\create-docker-hub-secret.ps1

Write-Host "Creating Docker Hub Secret for Kubernetes Deployment" -ForegroundColor Green
Write-Host "====================================================" -ForegroundColor Green
Write-Host ""

# Prompt for namespace
$NAMESPACE = Read-Host "Enter Kubernetes namespace (e.g., jira-analyzer)"
if ([string]::IsNullOrWhiteSpace($NAMESPACE)) {
    Write-Host "Error: Namespace cannot be empty" -ForegroundColor Red
    exit 1
}

# Prompt for Docker Hub credentials
$DOCKER_USERNAME = Read-Host "Enter Docker Hub username"
$DOCKER_PASSWORD = Read-Host "Enter Docker Hub password/token" -AsSecureString
$DOCKER_EMAIL = Read-Host "Enter Docker Hub email"

# Convert secure string to plain text
$DOCKER_PASSWORD_TEXT = [System.Runtime.InteropServices.Marshal]::PtrToStringAuto([System.Runtime.InteropServices.Marshal]::SecureStringToBSTR($DOCKER_PASSWORD))

# Create namespace if it doesn't exist
Write-Host ""
Write-Host "Creating namespace '$NAMESPACE' if not exists..." -ForegroundColor Yellow
kubectl create namespace $NAMESPACE --dry-run=client -o yaml | kubectl apply -f -

# Create the Docker Hub secret
Write-Host "Creating docker-hub-secret in namespace '$NAMESPACE'..." -ForegroundColor Yellow
kubectl create secret docker-registry docker-hub-secret `
  --docker-server=https://index.docker.io/v1/ `
  --docker-username="$DOCKER_USERNAME" `
  --docker-password="$DOCKER_PASSWORD_TEXT" `
  --docker-email="$DOCKER_EMAIL" `
  --namespace=$NAMESPACE `
  --dry-run=client -o yaml | kubectl apply -f -

Write-Host ""
Write-Host "✅ Docker Hub secret created successfully in namespace '$NAMESPACE'!" -ForegroundColor Green
Write-Host ""
Create a branch in your github where the pushes will cause argocd to deploy the manifests. This can be any branch but in this example I'll be using the branch names "k8s-deployment". Please remember the name of the branch as it will be used to configure the argocd in the next step.
You now need to create a GH actions which builds images and pushes them to the docker hub. This can be done by creating a yaml file in the .github/workflows folder.
Note
After this step make sure that you update the kubernetes manifest files to use the images from docker hub. like the image tags should be ritservi/project-frontend:latest
YOu can use the following GH actions file for reference and ask claude to cahnge just the images name to match your project.
You just need to create a secret in the gituhb with name DOCKER_HUB_TOKEN and the value of the personal access token you created from docker hub. Please make sure this token has the access level to write tot the docker hub registry.
name: Build and Push Docker Images

on:
  push:
    branches:
      - k8s-deployment
  pull_request:
    branches:
      - k8s-deployment
    types: [closed]

env:
  DOCKER_HUB_USERNAME: ritservices0000
  REGISTRY: docker.io

jobs:
  build-and-push:
    runs-on: ubuntu-latest
    permissions:
      contents: write
      packages: write

    steps:
      - name: Checkout code
        uses: actions/checkout@v4

      - name: Set up Docker Buildx
        uses: docker/setup-buildx-action@v3

      - name: Log in to Docker Hub
        uses: docker/login-action@v3
        with:
          username: ${{ env.DOCKER_HUB_USERNAME }}
          password: ${{ secrets.DOCKER_HUB_TOKEN }}

      - name: Extract metadata
        id: meta
        run: |
          # Get version from tag or use commit SHA
          if [[ $GITHUB_REF == refs/tags/v* ]]; then
            VERSION=${GITHUB_REF#refs/tags/v}
          else
            VERSION=sha-${GITHUB_SHA::8}
          fi
          echo "VERSION=${VERSION}" >> $GITHUB_OUTPUT
          echo "BUILD_DATE=$(date -u +'%Y-%m-%dT%H:%M:%SZ')" >> $GITHUB_OUTPUT
          echo "GIT_COMMIT=${GITHUB_SHA}" >> $GITHUB_OUTPUT

      - name: Build and push Backend image
        uses: docker/build-push-action@v5
        with:
          context: ./backend
          file: ./backend/Dockerfile
          push: ${{ github.event_name != 'pull_request' }}
          tags: |
            ritservi/jira-analyzer-backend:latest
            ritservi/jira-analyzer-backend:${{ steps.meta.outputs.VERSION }}
          labels: |
            org.opencontainers.image.title=JIRA Analyzer Backend
            org.opencontainers.image.version=${{ steps.meta.outputs.VERSION }}
            org.opencontainers.image.created=${{ steps.meta.outputs.BUILD_DATE }}
            org.opencontainers.image.revision=${{ steps.meta.outputs.GIT_COMMIT }}
          cache-from: type=gha
          cache-to: type=gha,mode=max
          platforms: linux/amd64

      - name: Build and push Frontend image
        uses: docker/build-push-action@v5
        with:
          context: ./frontend
          file: ./frontend/Dockerfile
          push: ${{ github.event_name != 'pull_request' }}
          tags: |
            ritservi/jira-analyzer-frontend:latest
            ritservi/jira-analyzer-frontend:${{ steps.meta.outputs.VERSION }}
          labels: |
            org.opencontainers.image.title=JIRA Analyzer Frontend
            org.opencontainers.image.version=${{ steps.meta.outputs.VERSION }}
            org.opencontainers.image.created=${{ steps.meta.outputs.BUILD_DATE }}
            org.opencontainers.image.revision=${{ steps.meta.outputs.GIT_COMMIT }}
          cache-from: type=gha
          cache-to: type=gha,mode=max
          platforms: linux/amd64

      - name: Update deployment manifest with new image tags
        if: github.ref == 'refs/heads/k8s-deployment' && github.event_name == 'push'
        run: |
          # Update image tags in k8s/jira-analyzer-k8s.yaml
          sed -i "s|image: ritservi/jira-analyzer-backend:.*|image: ritservi/jira-analyzer-backend:${{ steps.meta.outputs.VERSION }}|g" k8s/jira-analyzer-k8s.yaml
          sed -i "s|image: ritservi/jira-analyzer-frontend:.*|image: ritservi/jira-analyzer-frontend:${{ steps.meta.outputs.VERSION }}|g" k8s/jira-analyzer-k8s.yaml

          # Commit and push changes
          git config --local user.email "action@github.com"
          git config --local user.name "GitHub Action"
          git add k8s/jira-analyzer-k8s.yaml
          git diff --staged --quiet || git commit -m "Update image tags to ${{ steps.meta.outputs.VERSION }}"
          git push

      - name: Trigger ArgoCD Webhook
        if: |
          (github.ref == 'refs/heads/k8s-deployment' && github.event_name == 'push') ||
          (github.event_name == 'pull_request' && github.event.pull_request.merged == true && github.event.pull_request.base.ref == 'k8s-deployment')
        run: |
          curl -X POST https://argocd.rit.services/api/webhook \
            -H "Content-Type: application/json" \
            -d '{
              "repository": "${{ github.repository }}",
              "ref": "${{ github.ref }}",
              "commit": "${{ github.sha }}",
              "version": "${{ steps.meta.outputs.VERSION }}",
              "timestamp": "${{ steps.meta.outputs.BUILD_DATE }}",
              "backend_image": "ritservi/jira-analyzer-backend:${{ steps.meta.outputs.VERSION }}",
              "frontend_image": "ritservi/jira-analyzer-frontend:${{ steps.meta.outputs.VERSION }}",
              "event": "${{ github.event_name == 'pull_request' && 'pr_merge' || 'direct_push' }}",
              "pr_number": "${{ github.event.pull_request.number || 'null' }}",
              "pr_title": "${{ github.event.pull_request.title || 'null' }}",
              "actor": "${{ github.actor }}"
            }'
You need to configure your project in ArgoCD. This can be done through UI by going to link https://argocd.rit.services
The credentials for this are in the vaultwarden "Kubernetes: folder.
Warning
Make sure that you have setup DNS for the hostname that you are using. Please refer to How To Add DNS guide.
- Add the repository into argocd.
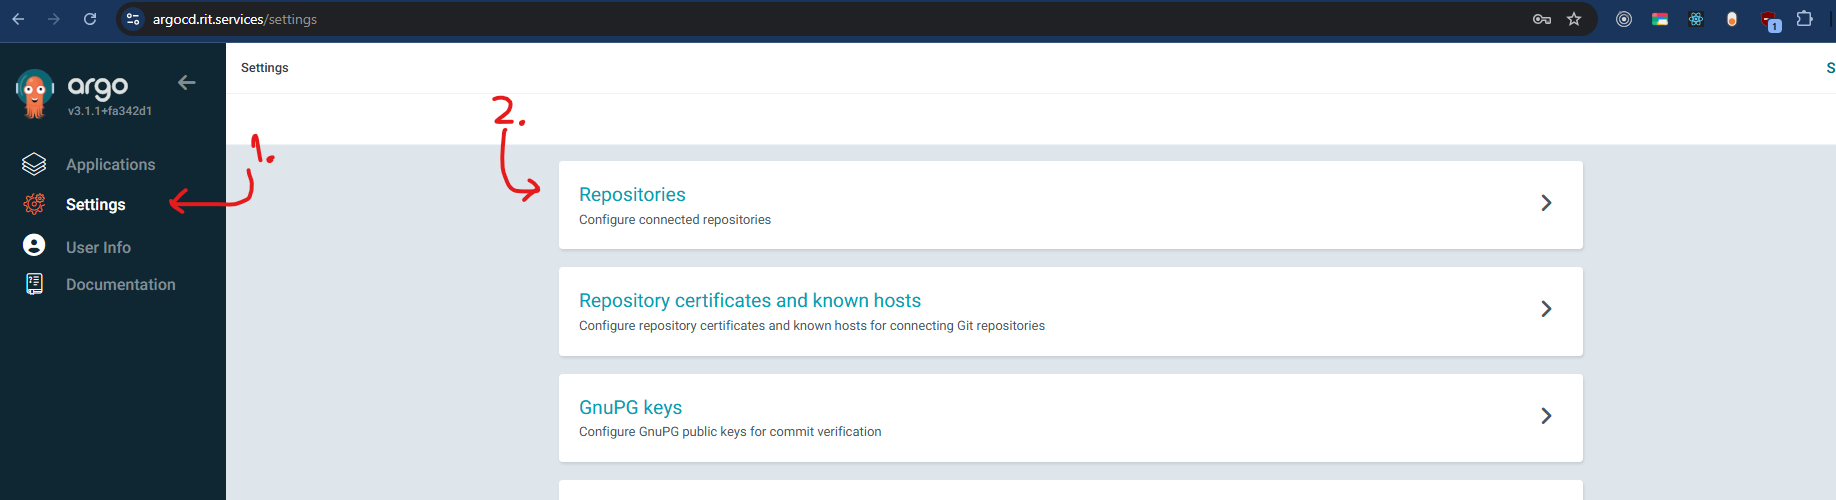
- Click on Connect Repo Button.
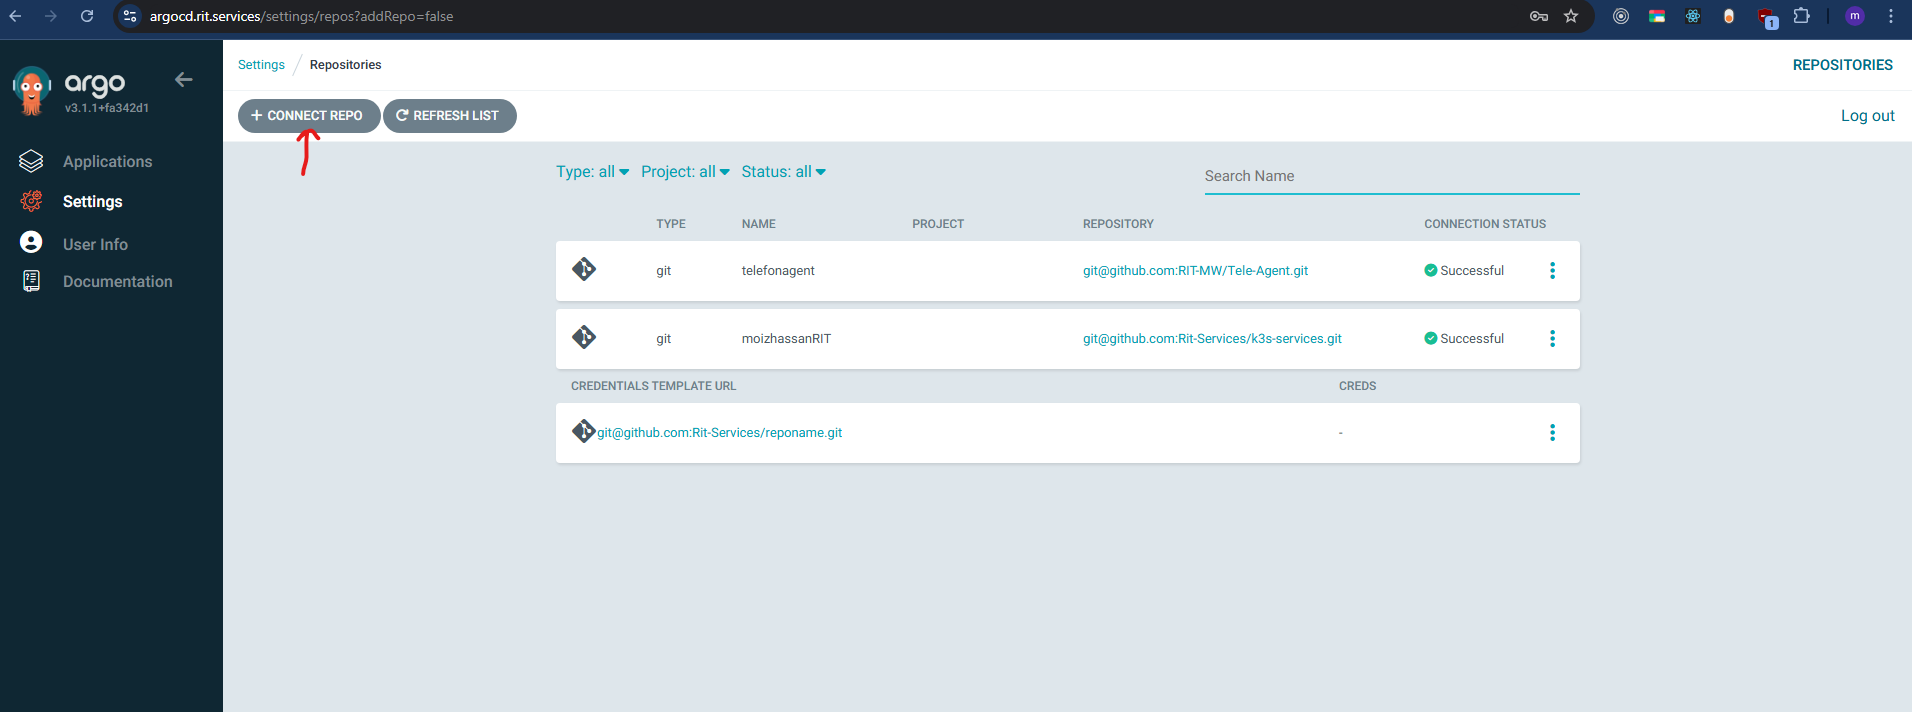
- Fill in the details as given in the picture.
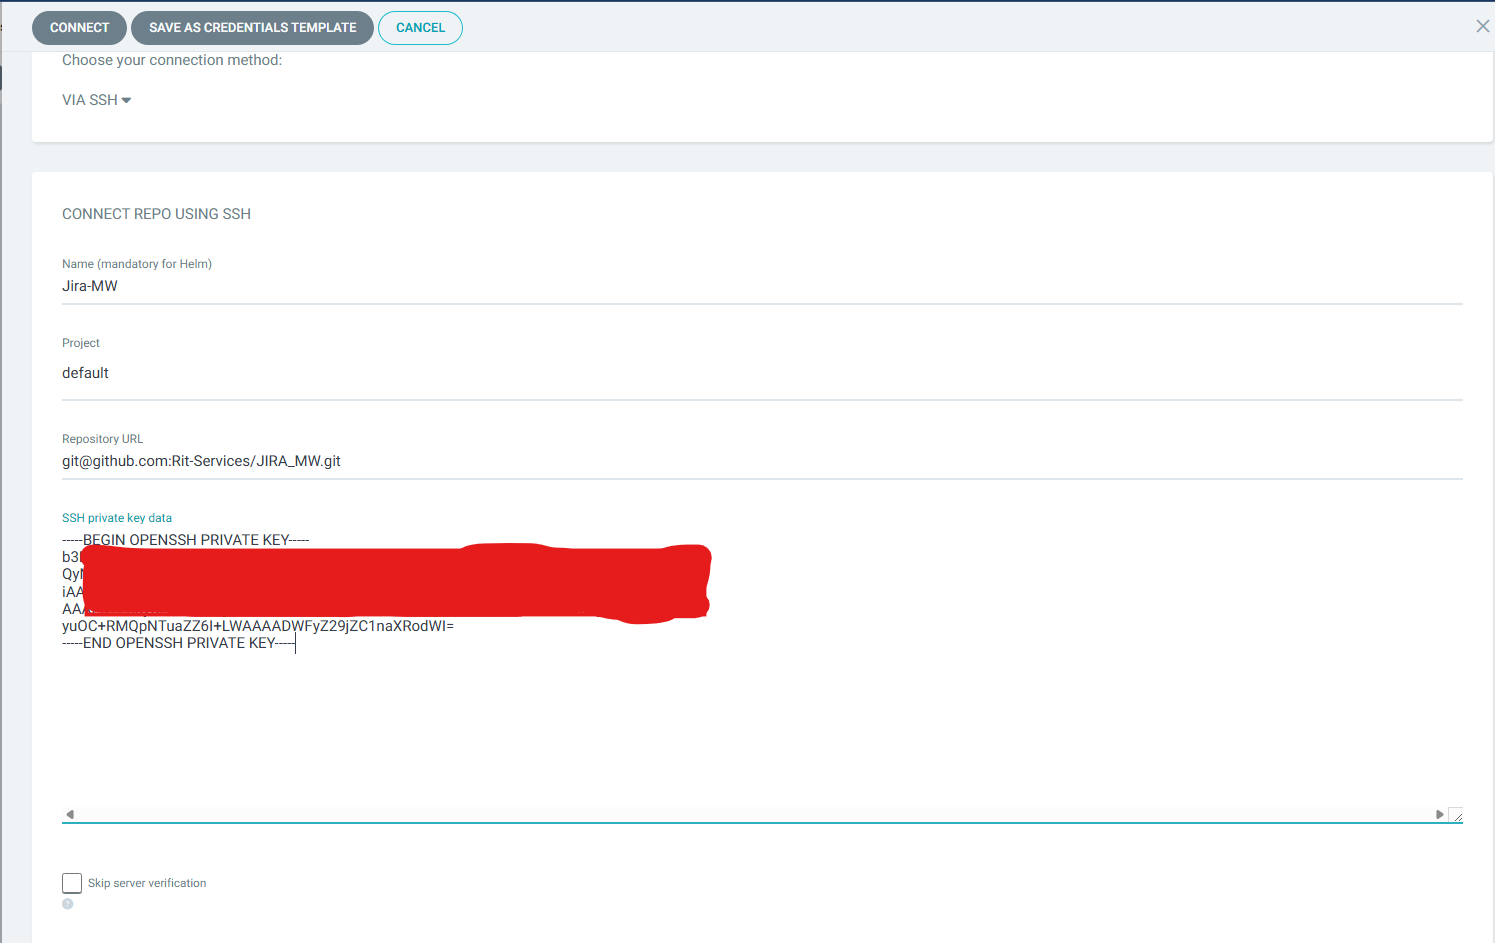
Note
Name can be anything and project can be default. Make sure that in repository URL if connection method is ssh then url is of ssh type. For the SSH private key you can generate it from your github account from : https://github.com/settings/keys
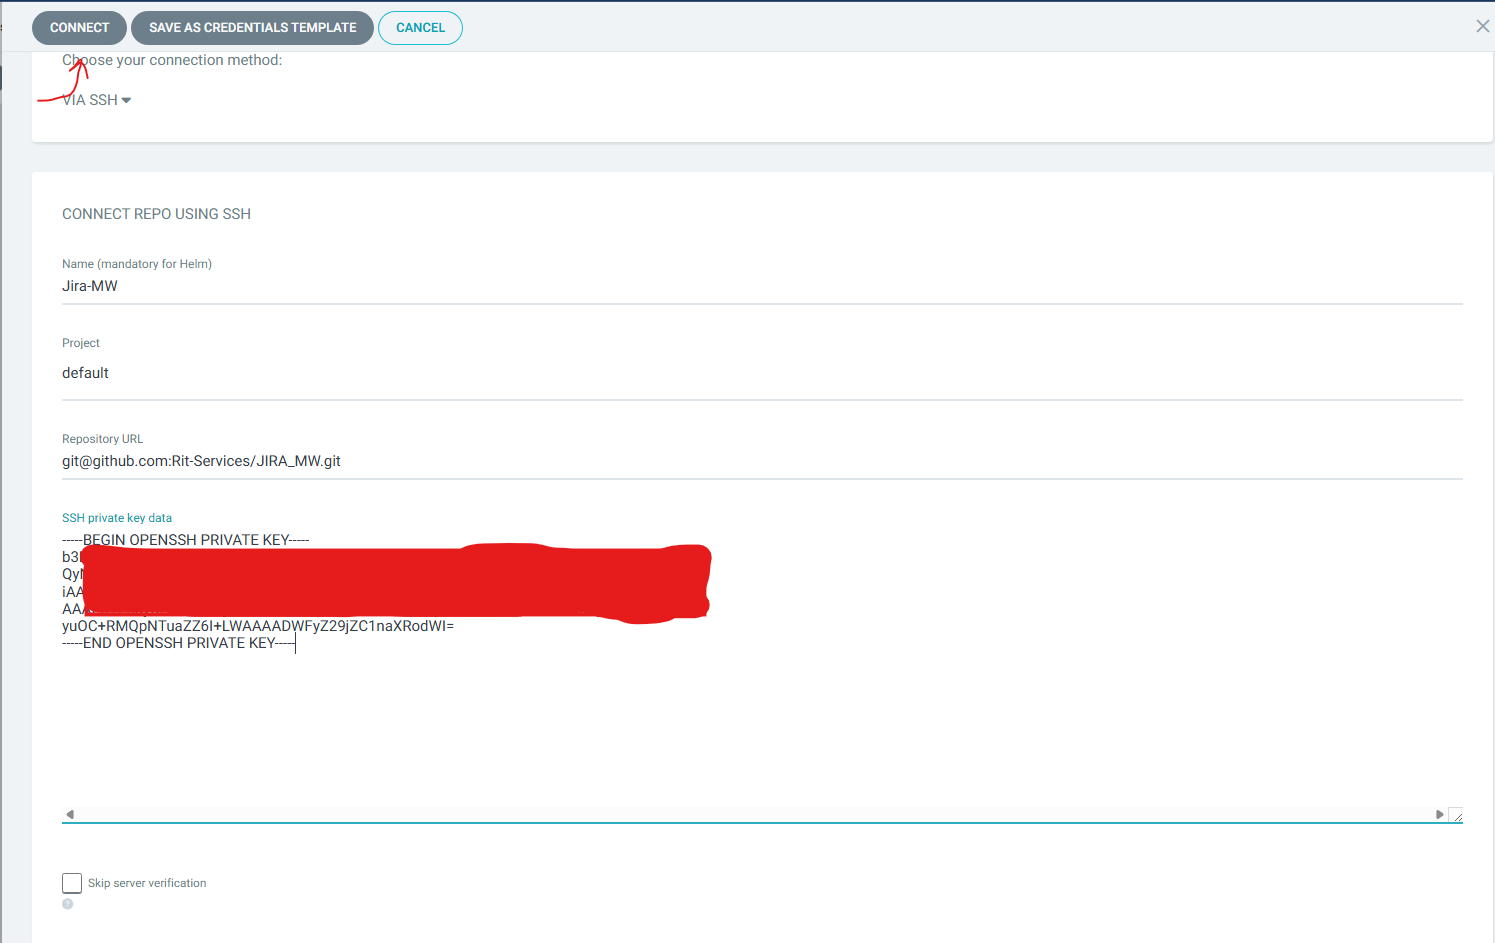
- Click on coneect Button.
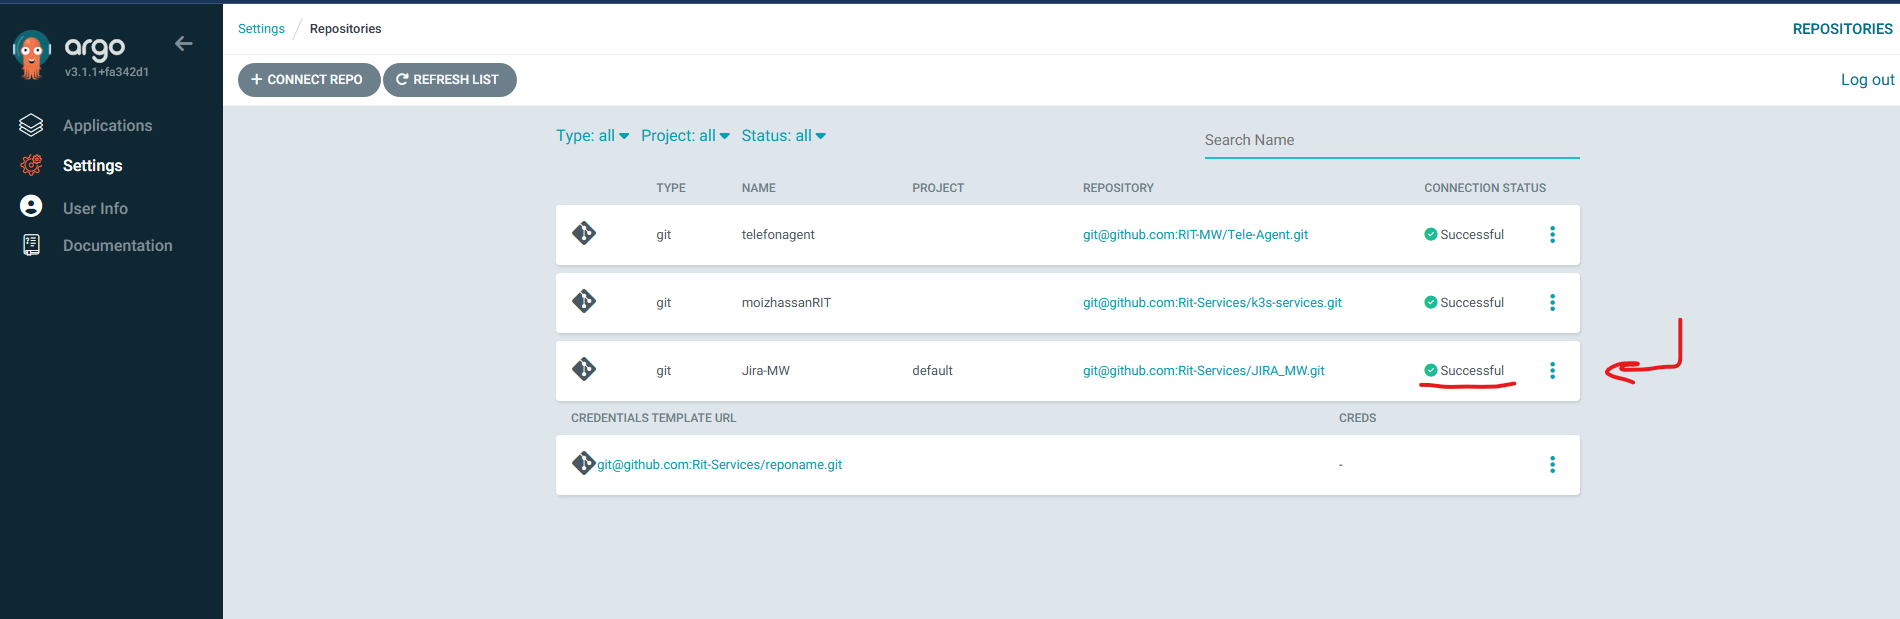
- Now you should be able to see the repository in the list with successful status.
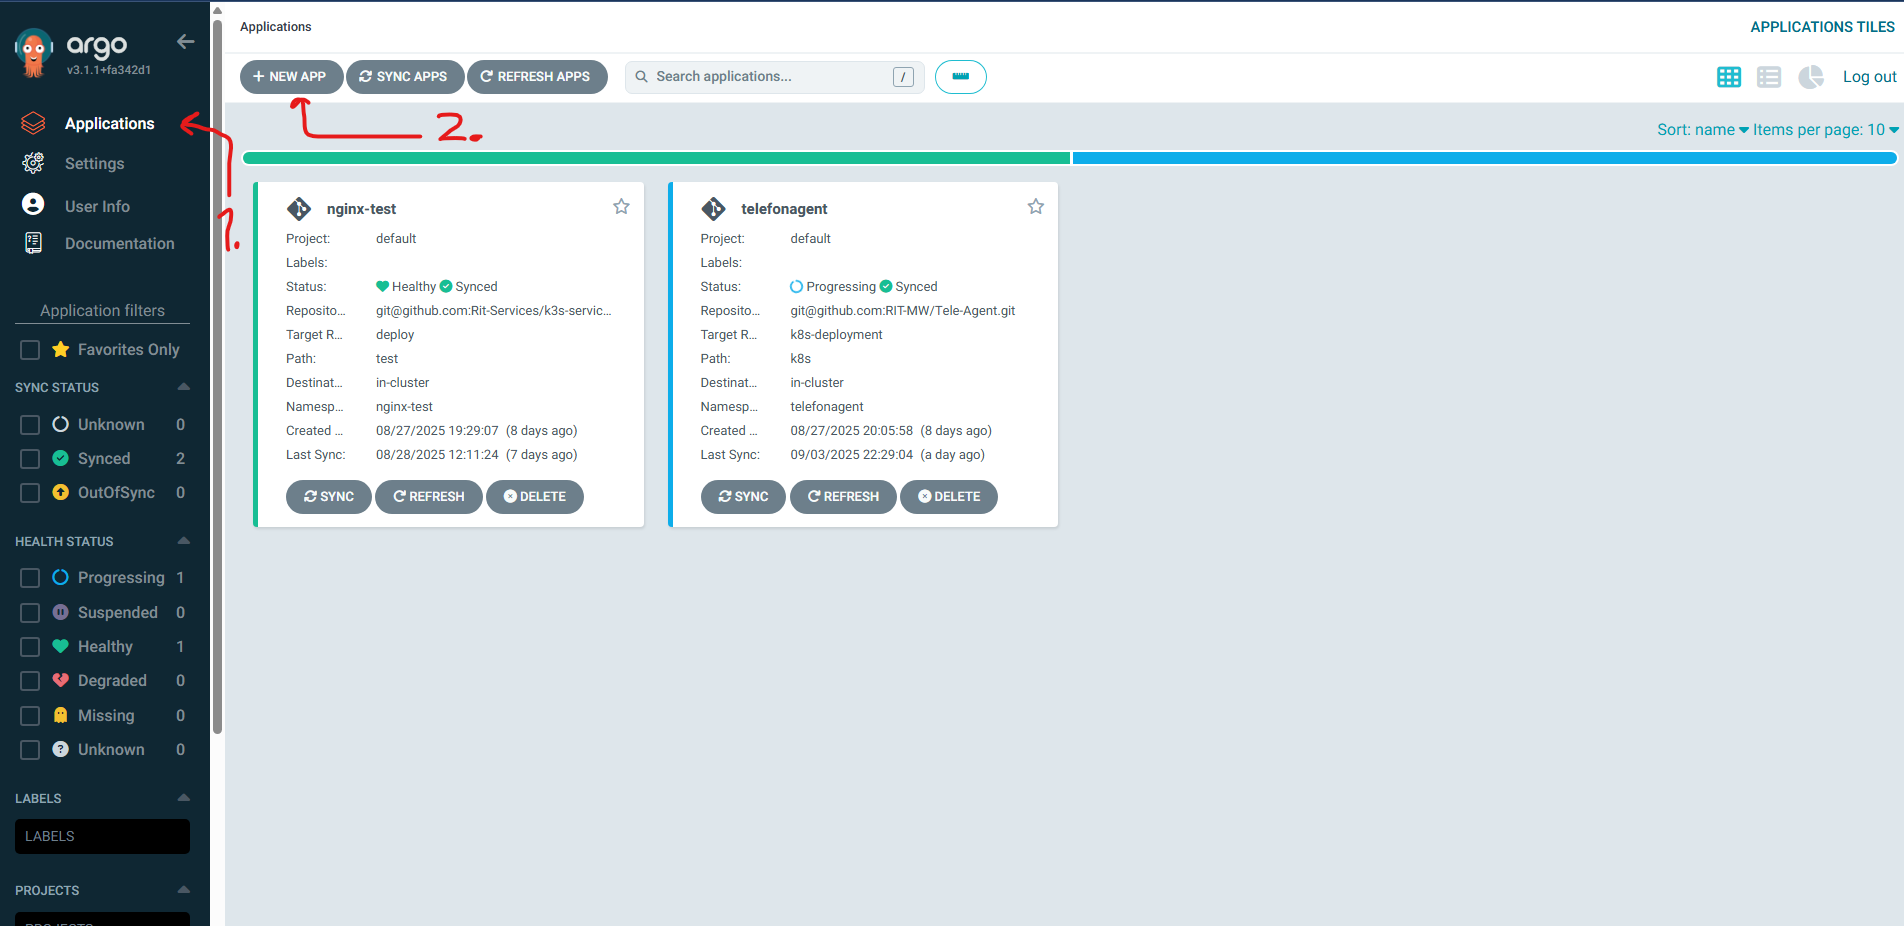
- Create a new Application.
- Fill in the details in General Section as shown in picture. Its mostlyu name and the red arrowws shows what checkboxes and select should be selected.
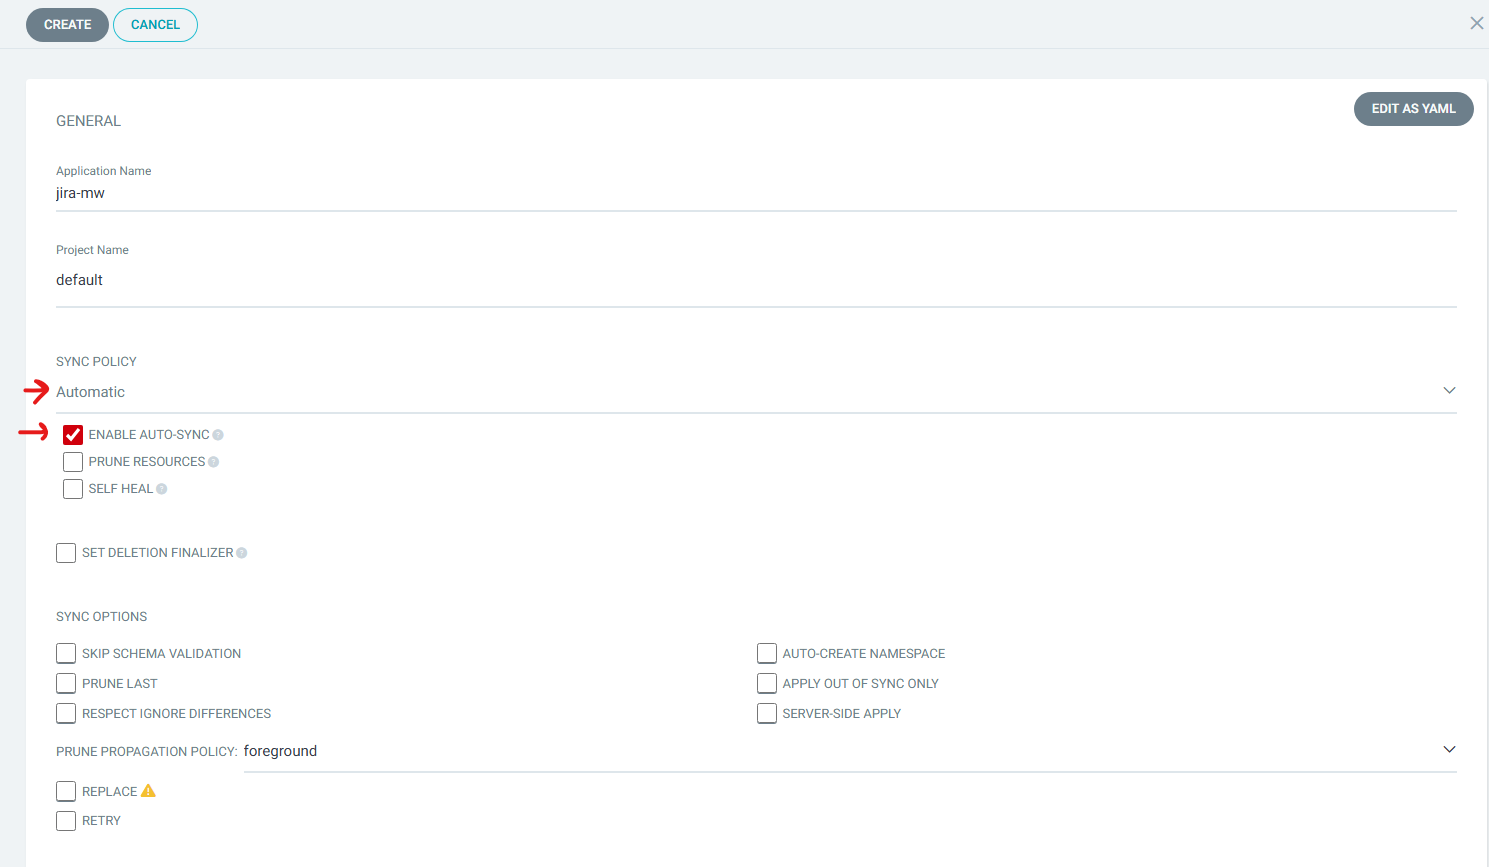
- In the source section: In
Repository URL select your github repo from dropdown. In Revesion enter the name of the branch for which you want automatic deployment on. In Path enter the path to the folder where the manifests are. Picture is given below as an example.
- In the Destination section:In
Cluster URL there would be only one option select it. In Namespace select the namespace where you want the deployment to be done. This is defined in the kubernetes manifest. 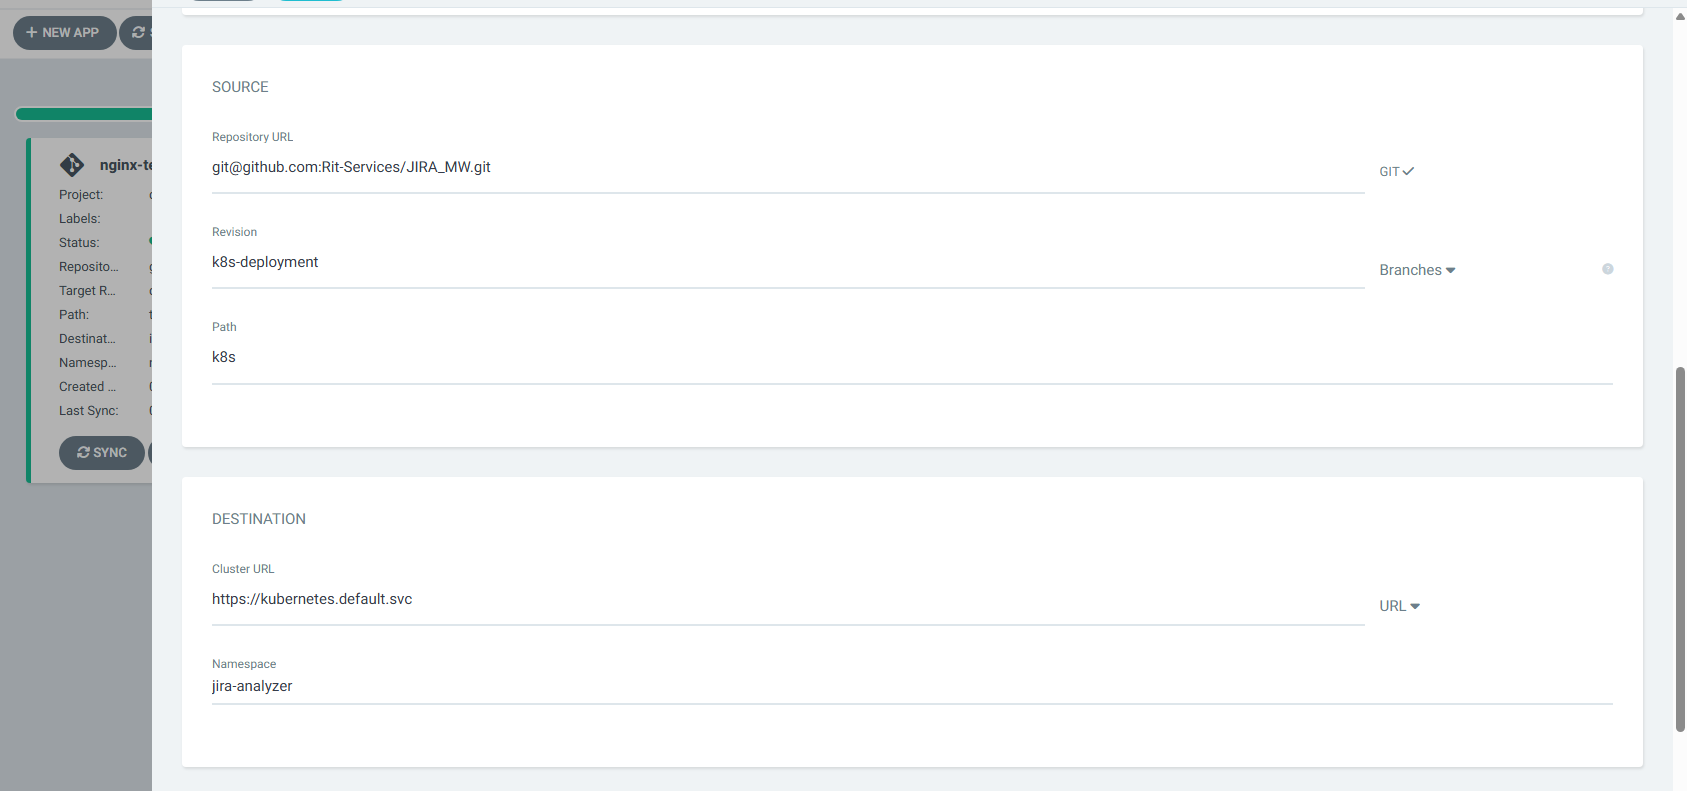
- Click on Create Application.
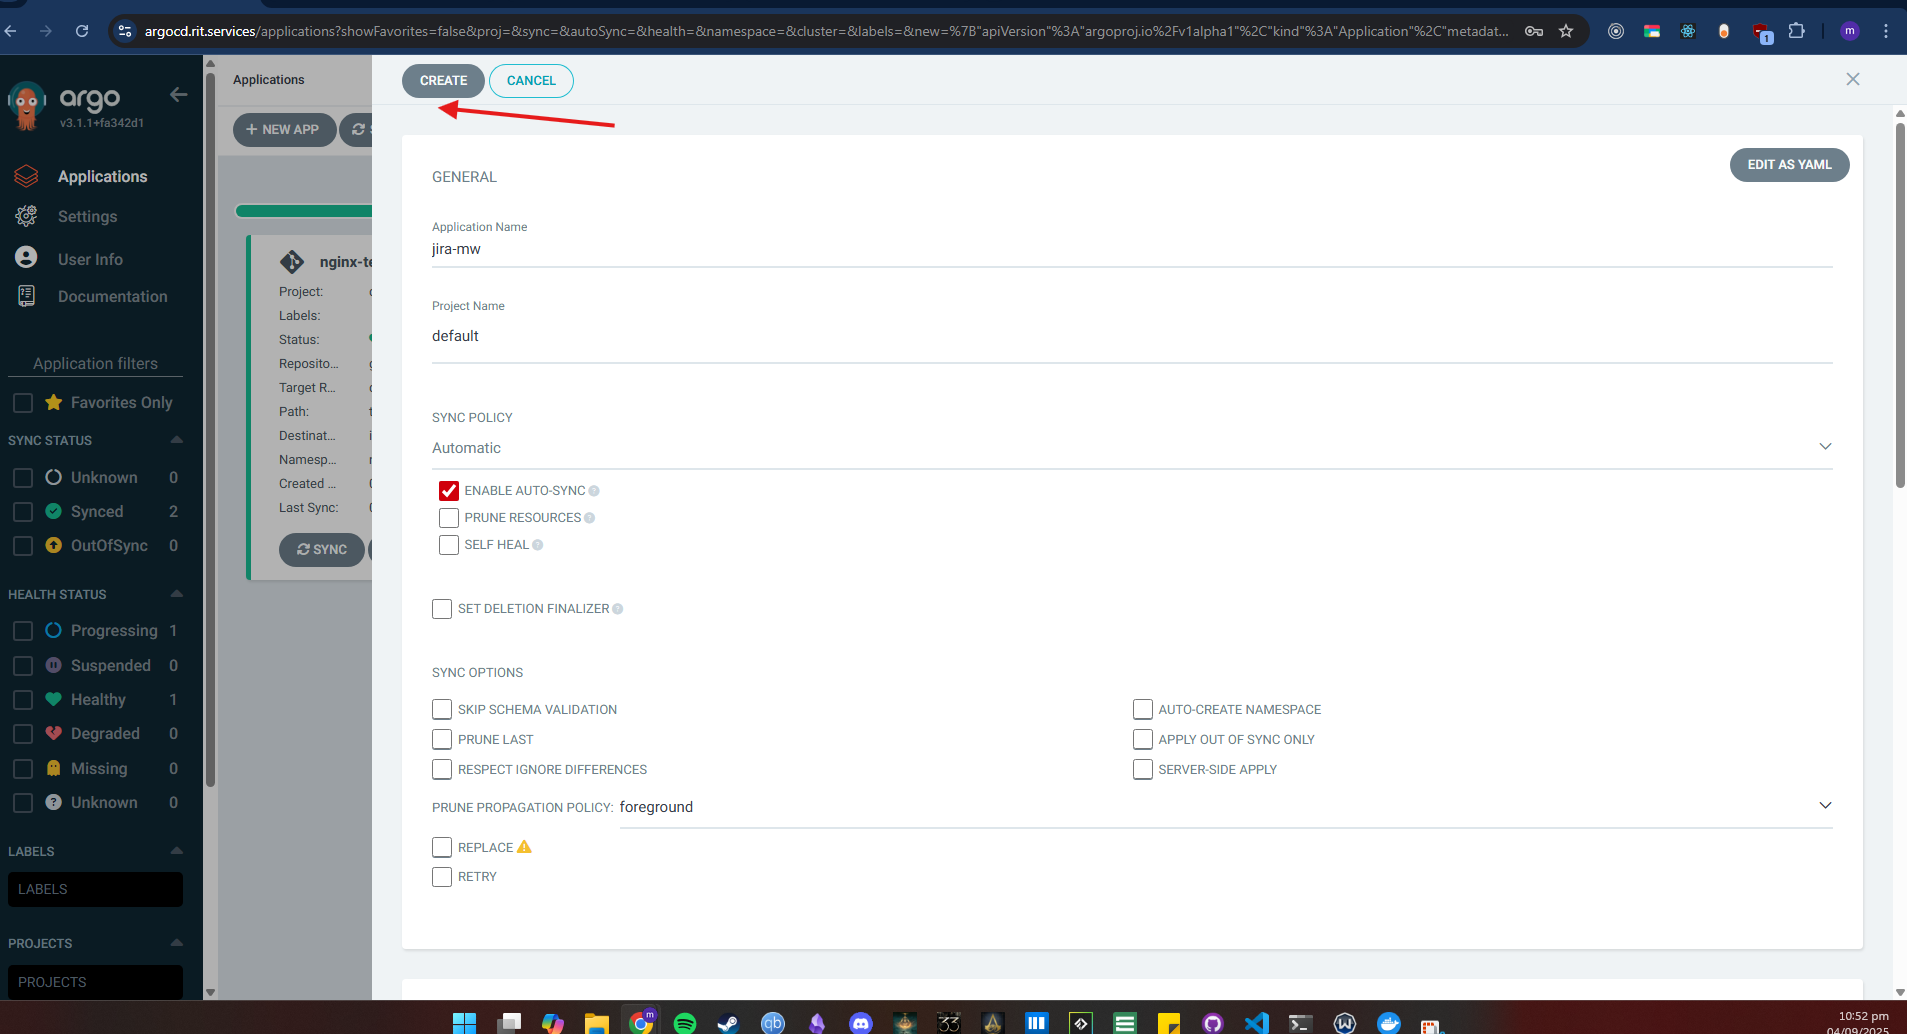
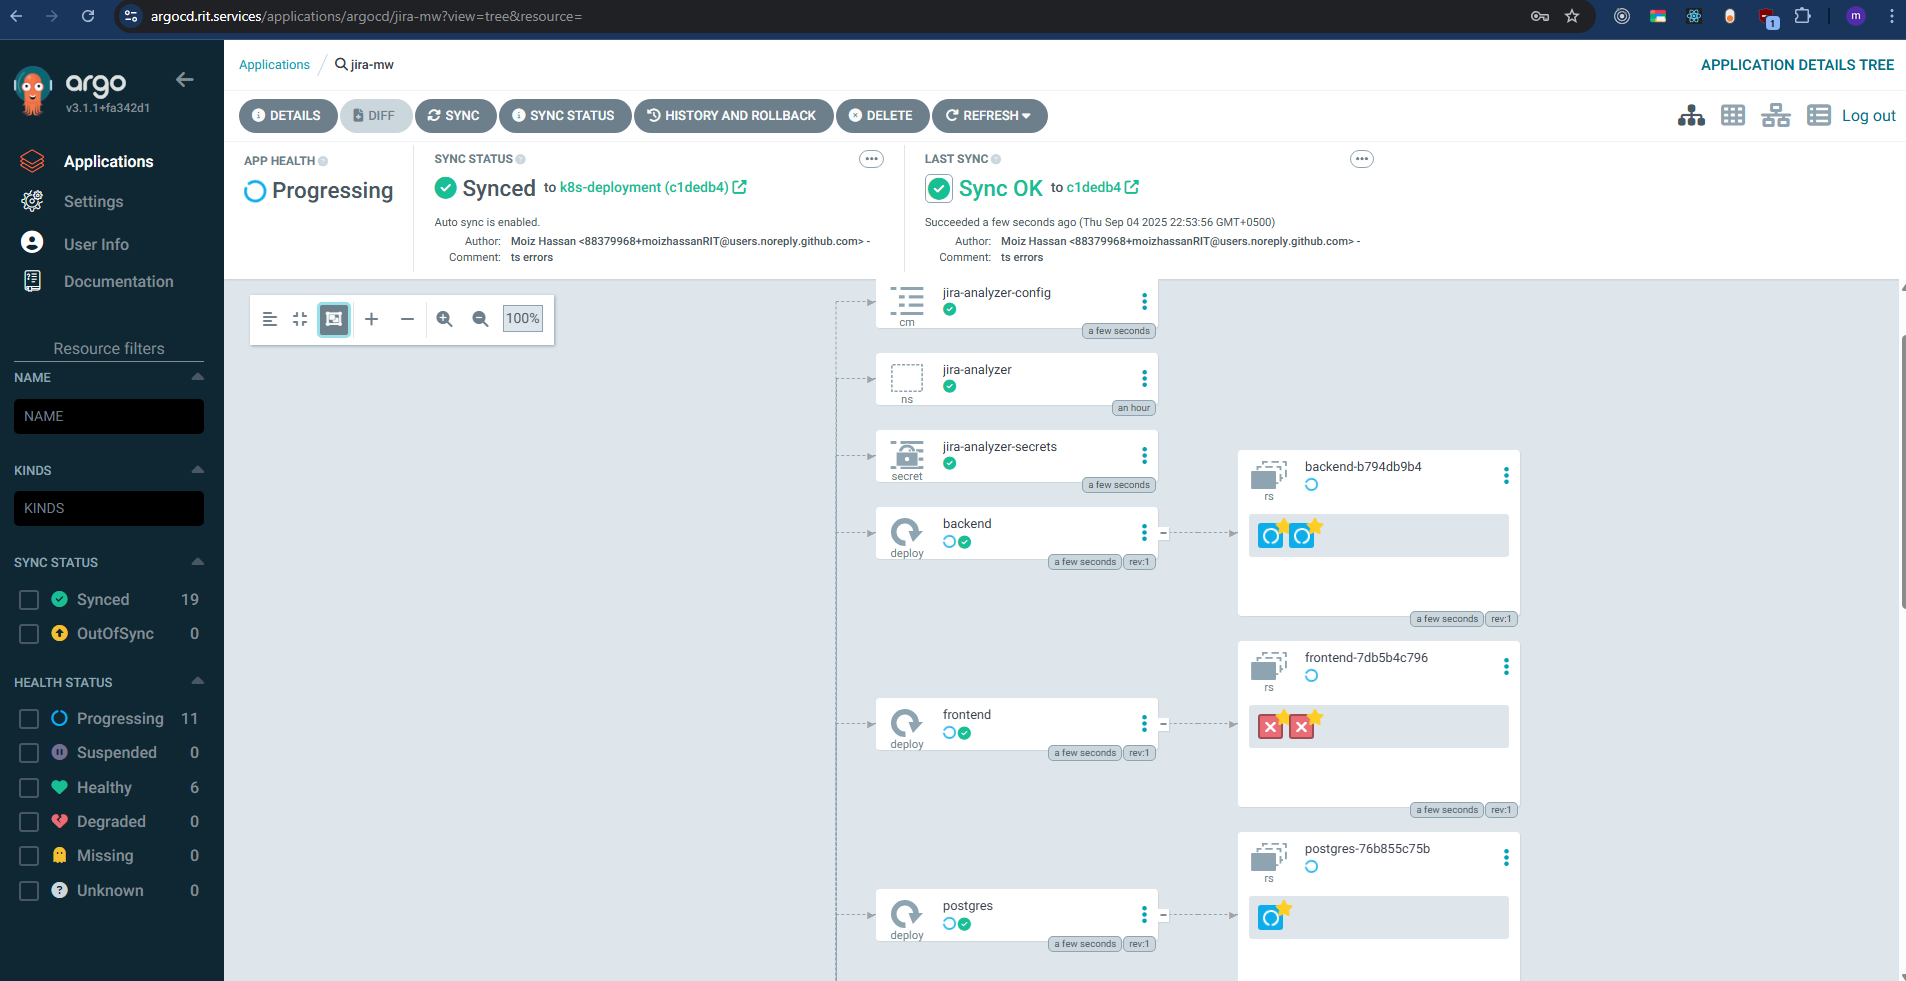
This should create the application and the deployment should start. You can check the status of the deployment by clicking on the Application. This list downs all resources that the application is using. It will auto deploy on the specified branch now also.